

[2024] How To Make A Website To Sell Clothes In 8 Steps
Are you thinking about starting your own online clothing business? Whether you're an aspiring fashion designer, a boutique owner, or just someone with a passion for fashion, creating a website to sell clothes is a must for the new digital world we live in. Well, you are in the right place! We’ll take you through the step-by-step process to show you how to make a website to sell clothes, from choosing a platform to setting up your website to launching and promoting it.
For any aspiring online business owner like you, there are plenty of options, but we’ll focus on three leading platforms with the highest market share by 2023: Shopify, WooCommerce, and Magento. Each excels in its own way, making them the cream of the crop on the market.
Now, you might be thinking that creating a website is a daunting task, but don’t worry, we’ve got you covered. By following the simple steps below, you'll easily make your dream website and start selling clothes right away:
- Find Your Ideal Online Store Builder
- Choose Your Website Builder Plan
- Select Your Domain Name
- Pick a Template That Fits
- Customize Your Template
- Add Products to Your Store
- Set Up Payment Processor
- Preview and Publish Your Online Store
1. Find Your Ideal Online Store Builder
Online store builders offer an easy and cost-effective way to create and manage online stores. They offer a range of products and tools to help you manage your store and grow your business, without the need to hire a web developer or designer.
There are so many online store builders out there, so it’s a bit overwhelming with all the options. However, don't worry, we’ve researched and narrowed down the top three providers we think are worth considering: Shopify, WooCommerce, and Magento.
Here’s an overview of these platforms to help you get a brief idea about them.
- Shopify - Best e-commerce platform overall. Greatest strength: Improved inventory management
- WooCommerce - Ideal for WordPress users. Greatest strength: Flexibility
- Magento - Ideal for enterprise-level projects. Greatest strength: Scalability
Here, you can find the ratings of Shopify, WooCommerce, and Magento to compare their strengths and weaknesses:


Shopify
If you are looking for the best website to sell clothes online, Shopify is for you. Its comprehensive inventory management system simplifies inventory management in several ways. It offers a user-friendly interface with an intuitive dashboard, making it suitable for beginners.
Shopify offers themes and templates to create visually appealing stores without coding. The platform’s robust App Store offers several plugins and integrations to improve the functionality of the store.
From inventory management to social media integration, there’s an app for just about everything you need. Shopify is ideal for newbies or those who want a hassle-free setup.
WooCommerce
If you are a WordPress user, WooCommerce might be the best choice for you. It is a popular e-commerce plugin that offers a wide variety of features and options.
Its flexibility allows you to customize your online store to your specific needs and requirements. You can choose from various themes and extensions and integrate them with multiple payment gateways and shippers.
Magento
Magento is the best choice for enterprise level. It is a powerful e-commerce platform designed to handle large transactions. Its scalability makes it easy to manage your online store and grow as your business expands. Magento offers a wide range of features and scalable options including advanced management tools, marketing tools, and multi-functional stores.
Before making the final decision, make sure you choose a platform that not only supports your business but also gives you full control. Look for a platform that offers a comprehensive ecosystem of tools and products that help you manage and grow your online store with confidence.
Lonca's Advice: If you're considering launching your first website, Lonca highly recommends Shopify as the perfect choice. With Shopify, you don't need any coding experience or design expertise to create a stunning website. It's user-friendly, making website building accessible to everyone. Additionally, Shopify offers budget-friendly plans, ensuring you get the most value for your investment. Discover the simplicity and cost-effectiveness of Shopify as your gateway to successful online business.
2. Choose Your Website Builder Plan
If your research is over and you have chosen your store builder, it's time to choose the most suitable plan for you. This is the point where you decide on the services, features, and ultimately the budget that's going to help shape your online store's success.
Each platform, be it Shopify, WooCommerce, or Magento, offers subscription plans with different features and pricing structures. But as it is our recommendation, we are going to focus on Shopify, a platform that gives you a hassle-free, all-in-one solution to set up your online clothing store.
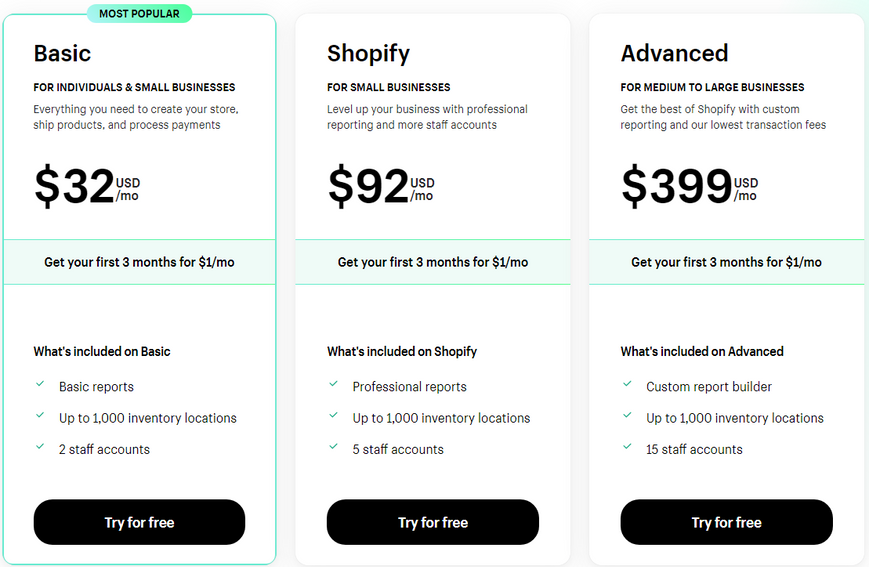
Shopify offers three plans:
- Basic Shopify is $32 per month
- Standard plan is $92 per month
- Advanced Shopify is $399 per month
Each level unlocks new features, from gift cards and business reports to shipping costs calculated by advanced report builders and new users. Also, now Shopify is offering a sweet deal that enables you to get all their plans for $1/month for 3 months!
As Lonca, for a small business clothing website, we suggest starting with Basic Shopify. One of the great things about this method of starting your online store is that it offers all the essentials you need, and it’s affordable. However, it’s worth bearing in mind that prices can vary depending on your location.
When choosing a plan, it’s important to consider not only your current needs but also your plans for future growth. It’s all about getting the best bang for your buck! If you’re interested in a detailed pricing plan, you can check out the official Shopify pricing page.
3. Select Your Domain Name
Choosing a domain name is a crucial step while working on making a website to sell clothes. So, what exactly is a domain name? Well, think of it as your virtual address on the web. It's the unique identifier that helps visitors find and remember your website.
When deciding on that perfect domain name, remember a few essential tips: keep it simple, easy to remember, and relevant to your brand. Ditch any complicated words or hard-to-spell gibberish. After all, the last thing you want is for your customers to get lost on their way to your online store!
Let your creativity loose and brainstorm some catchy names. Try combinations of words that reflect your type of clothing, style, or even your unique story.
If you’re having a hard time doing that, here are some of the many domain name generators where you can just type some keywords and get yourself a catchy domain name.
Once you've nailed that perfect domain name, it's time to register it. Many website builders including Shopify provide domain registration in their plans, or you could go to domain providers like GoDaddy. Check their domain search feature, see if your chosen name is available, and claim it right away!
That's all - you've taken another big step towards launching your online clothing store. If you want more insight, you can look into this article about choosing the right domain name.
4. Pick a Template That Fits
When it comes to choosing templates for your online store, think of them as physical store displays. They are key to enticing visitors to spend time browsing your website. Choosing a visually appealing and user-friendly design is crucial for creating an excellent shopping experience for your customers. We advise you to analyze all the options before choosing your template and find the one that fits perfectly with your vision and purpose.
If you're interested in discovering more about top-notch Shopify templates, including both paid and free choices, feel free to check out our detailed resource: [2023] Guide to the Best Shopify Themes for Clothing. This guide offers a thorough exploration of the topic.
When thinking of how to make a website to sell clothes, ask yourself a few questions about your template while keeping in mind the audience you're targeting. Therefore, it is important that your template can be optimized to the needs and liking of your customers; this will greatly help you to find the best template!
What does this template offer?
- What customization options are available for the template's color scheme and layout?
- Does the template support integration with social media platforms?
- Are there options for incorporating a blog or news section into the website?
- Can the template accommodate high-resolution images and media files?
- Is the navigation menu easy to customize and user-friendly?
- Does the template have support for multiple languages, if needed?
- Are there options for integrating an email newsletter sign-up form?
- Does the template offer support for e-commerce features, such as product galleries and checkout pages?
Who is my target audience?
- What age range do they fall into?
- What is their occupation?
- What are their interests and hobbies?
- What is their income level?
- What motivates them to make a purchase?
Understanding the target audience is important to select a suitable template that meets their expectations and creates a positive shopping experience. However, balancing personalization and customer satisfaction is important to create a successful online store.
If you want your online clothing store to succeed, making sure your template is mobile-responsive is an absolute must. More and more people are shopping on their phones. In fact, a recent study found that 60.66% of online shopping is now done on mobile devices while desktop traffic makes up 37.08% of the total traffic, and tablets contribute the smallest percentage, at 2.26%.
Google now prioritizes mobile-friendly sites in its search results. So, if your site isn't optimized for mobile, you're going to have a hard time getting found by new customers.
Shopify is a great option for beginners, as it offers a lot of pre-designed templates that are easy to customize. You can use many templates for free, although if you’re looking for a readier-to-use template, you can purchase one for 170 - 380$. Plus, it's incredibly user-friendly, so you won't need to be a tech whiz to get started.
WooCommerce, on the other hand, is a plugin for WordPress, which means you'll need to have some basic knowledge of website design to get started. However, it's incredibly flexible and customizable, so you can create a unique look and feel for your store. It also offers free and paid templates for 79 - 99$ annually – you can choose from!
Magento is an open-source platform that's ideal for larger stores with a more complex product catalog. It's highly customizable but requires more technical know-how to start. Magento does not provide free templates but you can get one for 17-399$.
Lonca's Advice: If you're here, chances are you're setting up a website for the first time. When it comes to choosing a theme for your site, you'll want to pick the best one, but keep in mind that perfection is hard to achieve right off the bat. Even if you think you've found the perfect theme, you won't know until your customers start using your site. That's why as Lonca, we recommend starting with free templates. By doing this, you can get a better understanding of your customers' needs and tweak your theme accordingly. Both Shopify and WooCommerce offer free templates, but it's worth noting that Magento does not. In this case, we suggest selecting a template that's as affordable as possible to start. Remember, you can always switch up your theme later on as your site grows.
5. Customize Your Template
Now comes the fun part - customizing your template to make it uniquely yours. You can customize your template without any coding knowledge, so there's no need to worry. And the best part? It's super easy and actually pretty fun too!
Customizations in the template may include:
- Adding your brand's logo
- Choosing a color scheme and font that matches your brand
- Adding new pages like an 'About Us' page and product pages
- Resizing the sections included in the template
- Adding high-quality picture(s) or video(s) to your Homepage
- Incorporating a blog section to produce content that appeals to your intended audience
- Arranging the showcase of your products
You can also hire a web designer to help you create a custom design for your brand, but this will come with a high price tag. Putting your spin on a small business clothing website can seem intimidating but remember it’s all about expressing your brand's uniqueness and who can do this better than you?
6. Add Products to Your Store
You are here to learn how to make a website to sell clothes, thus you've probably figured out what to sell already. If not, now's the time to start thinking about it.
When you've got them ready, we have explained how to add your products to your store assuming you've chosen Shopify as your website builder. Here's how to add them to your store:
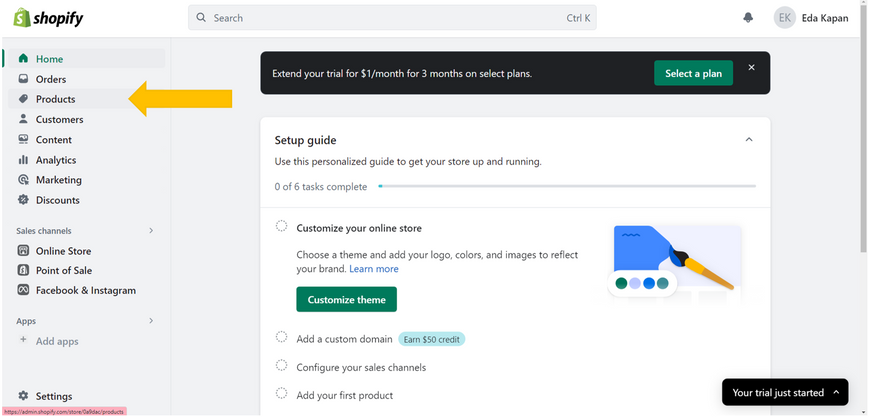
- First, from your Shopify admin, click on "Products" in the left-hand menu. Then, click on the "Add your products" button.
- After that, enter your product details, including title, description, price, and image(s). Set up any product variants, such as size, quantity, or color options. You can also edit 'Search engine listing' options to customize what your customers will see on search engines. Then change your product status to active to make the product available in your store.
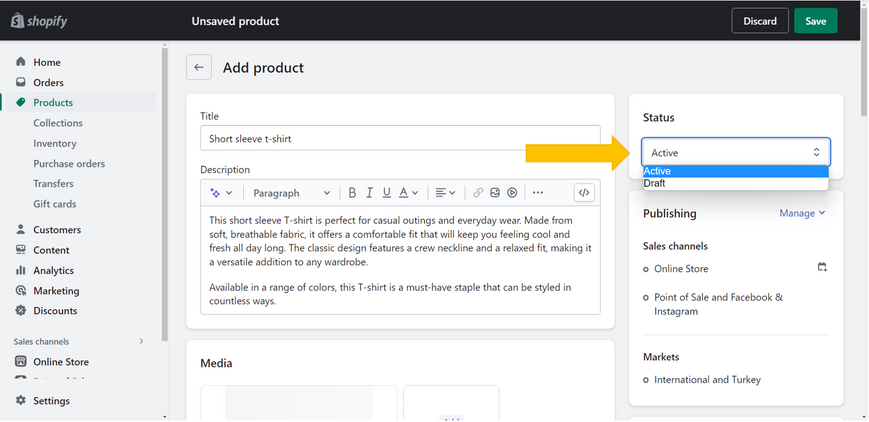
- Next up, click manage to choose where you want your products to be available such as your online store, Facebook, Snapchat, etc.
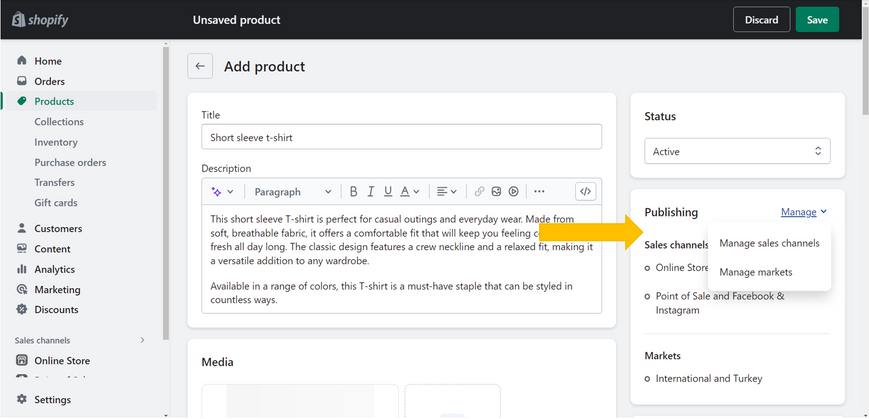
- Finally, click the ‘Save’ button and that’s it! Now, your customers will see your product on the channels/apps of your choice.
If you have further questions, check out Shopify Help Center. If you’re interested in the other two platforms, visit these WooCommerce and Magento guides on how to add products.
Keep these things in mind when adding products to your online store:
- Clear, descriptive product titles
- Detailed and informative product descriptions
- High-quality product images
- Clear product variants
- Competitive and accurate pricing
- Accurate inventory management
- Careful shipping and payment settings
- Search engine optimization for product titles, descriptions, and images
- Organized product categories and collections
One of the critical things to consider about how to make a website to sell clothes is that you need to create a positive shopping experience for your customers and ensure that your products are presented in the best possible light. With a well-stocked and well-designed online store, you'll be on your way to success in no time!
7. Set Up Payment Processor
Understanding and establishing a decent online payment system is key to a successful e-commerce enterprise. Why? Because it is at the crux of all transactions! Let's dive into the transactional dynamics of three popular e-commerce platforms – Shopify, Magento, and WooCommerce.

Shopify
- Offers its payment processor: Shopify Payments which is powered by Stripe. It's as integrated and user-friendly as it gets.
- Shopify payments charge based on your selected plan. The higher the plan, the less the transaction fees.
- You can opt to use other payment gateways like PayPal, Amazon Pay, etc.
For Shopify, we would suggest starting with 'Shopify Payments'. Because not only does it have an easy setup and low transaction fees, but it also allows you to sell directly through your website, physical store, social media, and other third-party marketplaces. On top of that, Shopify's whole ecosystem works seamlessly with one another. You’ve got Shop Pay for streamlined and secure payment processing, Shopify POS for managing those in-person sales if you've got a brick-and-mortar store too, and even Shopify Fulfillment to ensure your products reach the doorsteps of your clients. It's like a one-stop shop for all your sales needs!
Magento
- Does not have a payment processor.
- You can integrate it with numerous payment gateways like PayPal, Braintree, Stripe, Authorize.net, and many more.
- The fees then would directly rely on the payment gateway you choose.
PayPal is trusted and can handle all sales volumes, including in-person payment solutions with PayPal here. Braintree offers customizable checkout processes and supports over 130 currencies, making it ideal for international sales. Authorize.net is a reliable and secure payment processing service that offers both online and in-store payment solutions, making it versatile for businesses operating in both physical and digital worlds.
WooCommerce
- Offers its own payment processor: WooCommerce Payments that are built with the WooCommerce WordPress plugin.
- They take a small fee directly from each payment that's made. The exact amount of the fee varies depending on different factors. But don't worry, you'll always know exactly how much you're being charged so there won't be any surprises.
- You can also integrate it with several payment gateways like PayPal, Stripe, Square, Braintree, Authorize.net, etc.
If you sell low-ticket items with low margins, PayPal and Stripe might be good options because they offer easy integration with WooCommerce and competitive transaction fees. Authorize.net or Braintree might be a better fit if you sell high-ticket items with higher margins because they offer advanced security features like fraud detection and prevention. If you also have a physical store, Square might be a good option because it can integrate your online and offline payment systems.
Ensuring the payment process is seamless, secure, and versatile (offering multiple methods) significantly enhances user experience. To ensure your online store runs smoothly and has no hiccups that could turn off customers, try making a test payment yourself. This way, you can see the process from the customer's perspective and identify any areas that might need improvement before they become a problem.
Remember, your payment process isn't just another step on your list– it’s your customer's last interaction with your store. Make it count!
8. Preview and Publish Your Online Store
We've created the ideal digital storefront! But before we launch our creation into the vast online world, there's one final but crucial step in the process of e-commerce.
Just like you wouldn't walk onto a stage without a dress rehearsal, you shouldn't launch your website without a proper preview. This is your chance to be in your user's shoes and experience their journey.
Is it easy to navigate?
Are all elements (images, texts, links) displaying correctly?
Is the checkout process smooth?
Is the website loading quickly and performing well?
Does it look good on different devices, including smartphones and tablets? Is it mobile-responsive?
Are the social media accounts integrated with the website, and are the links working correctly?
Let your friends, family, or even a handy group of testers have a go. Fresh perspectives uncover hidden insights, helping your site be the best version of itself.
Now, it's time for the final step - publishing your website. When you’ve finished previewing and made all the necessary changes, the website is ready to make its debut. And you’re ready to sell clothes online!
Your Online Store Awaits
Congratulations! You now have all the information you need to know. We’ve guided you through 8 steps of how to create a website to sell clothes and listed the e-commerce platforms you can use.
In the world of online fashion, Shopify shines as the ultimate platform for building your dream store. Its seamless integration, stunning design options, and robust features make it an unbeatable choice for fashion entrepreneurs like you.
Because Shopify is specifically designed for e-commerce, it has all the features you need to create a successful online clothing store. It's also incredibly user-friendly, so you don't need to be a tech expert to get started. Plus, with various pricing plans and 24/7 customer support, you can find the perfect plan for your business and get help whenever needed.
So, what are you waiting for? Follow these simple steps on how to sell clothes online from home and start selling!